Ice Hockey Manager - Logo Tutorial
Guide for creating custom team logos in Ice Hockey Manager
About this Tutorial
In principle, it's quite simple, but you need two special programs: Adobe Photoshop 5.5, which allows saving *.IFF images (I'm not aware of other programs, but the crucial function is the ability to save *.IFF images!).
You can download the required color palette here:
(1) The Template
Create a new image with the format 320x200 and add your "logos" to this area. They must be 38x38 in size - simply add as many as fit.
(2) The Color Palette Must Now Be Loaded
Step 1:
Go to Image -> Mode -> Indexed Colors
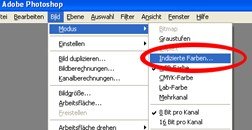 Example: Photoshop Menu - Image -> Mode -> Indexed Colors - Click to enlarge
Step 2:
Under Palette: select Custom...
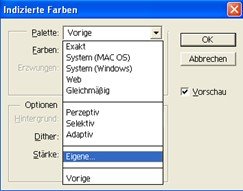 Example: Select palette "Custom..." - Click to enlarge
Step 3:
Then click the Load... button and select the color palette, depending on which folder it's located in.
 Example: Load color palette - Click to enlarge
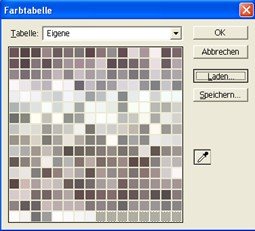
Step 4:
It should look like this - you'll probably notice a color change as well.
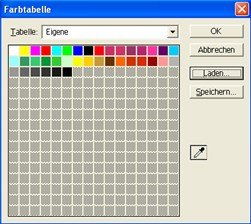 Example: Loaded color palette with color changes - Click to enlarge
(3) Saving as *.IFF File
Go to File -> Save a Copy... and save the image as (Amiga) IFF File.
The finished image should look something like this (shown here somewhat blurry):
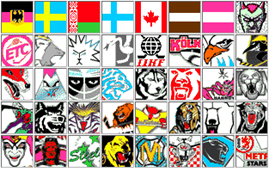 Example: Finished logo image in IFF format - Click to enlarge
(4) Copying Files from the "...EM\KB\" Folder
You now have your IFF image. Now the files 80.VGA to 143.VGA must be copied from the "KB" folder and copied into the "PIC" folder in the BMP directory, i.e., overwritten. A list for this can be found at the end of the tutorial.
(5) Loading the IFF Image into the BMP Team Editor
Copy your IFF image or images (depending on how industrious you were") ) into the BMP directory. Now you need to open the TEAMED.EXE, which should also be located in the BMP directory, and do the following:
) into the BMP directory. Now you need to open the TEAMED.EXE, which should also be located in the BMP directory, and do the following:
Click on one of the logos that you want to renew or change and click the LOAD IFF IMAGE! button. Then select your IFF file and you can choose the new logo.
Now just copy the *.VGA files 80 to 143 (from the "PIC" folder) back to the "...EM\KB\" folder, i.e., overwrite them, and you're done!
The Team List
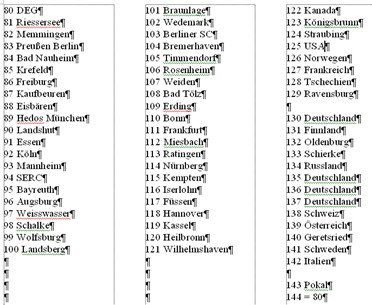 Example: Team list with logo assignments - Click to enlarge
I hope you now have (again) more fun with EM!
Guide for creating custom team logos in Ice Hockey Manager
About this Tutorial
In principle, it's quite simple, but you need two special programs: Adobe Photoshop 5.5, which allows saving *.IFF images (I'm not aware of other programs, but the crucial function is the ability to save *.IFF images!).
You can download the required color palette here:
(1) The Template
Create a new image with the format 320x200 and add your "logos" to this area. They must be 38x38 in size - simply add as many as fit.
(2) The Color Palette Must Now Be Loaded
Step 1:
Go to Image -> Mode -> Indexed Colors
Step 2:
Under Palette: select Custom...
Step 3:
Then click the Load... button and select the color palette, depending on which folder it's located in.
Step 4:
It should look like this - you'll probably notice a color change as well.
(3) Saving as *.IFF File
Go to File -> Save a Copy... and save the image as (Amiga) IFF File.
The finished image should look something like this (shown here somewhat blurry):
Note: Be aware that certain colors are displayed differently in the game! This requires some creativity, patience, and a delicate touch
(4) Copying Files from the "...EM\KB\" Folder
You now have your IFF image. Now the files 80.VGA to 143.VGA must be copied from the "KB" folder and copied into the "PIC" folder in the BMP directory, i.e., overwritten. A list for this can be found at the end of the tutorial.
(5) Loading the IFF Image into the BMP Team Editor
Copy your IFF image or images (depending on how industrious you were
) into the BMP directory. Now you need to open the TEAMED.EXE, which should also be located in the BMP directory, and do the following:Click on one of the logos that you want to renew or change and click the LOAD IFF IMAGE! button. Then select your IFF file and you can choose the new logo.
Now just copy the *.VGA files 80 to 143 (from the "PIC" folder) back to the "...EM\KB\" folder, i.e., overwrite them, and you're done!
The Team List
For completely different / new teams, you'll also need new names! To do this, you'll need to additionally download the Ice Hockey Manager Team Editor, for example from the Wasserlasser.com filebase for EM
I hope you now have (again) more fun with EM!
At this point, an overdue praise and thanks to
Möggi, Bolero, goalie and all users
for their tireless commitment to the preservation and constant updating of Ice Hockey Manager!!!
Möggi, Bolero, goalie and all users
for their tireless commitment to the preservation and constant updating of Ice Hockey Manager!!!
Have fun trying out logo creation! 