NHL 09 Widescreen Tutorial
A guide to playing NHL 09 on a widescreen monitor
Download the Wide09 program from the file base to your PC.
Copy Wide09 to your NHL09 directory and start the program.
Configuration
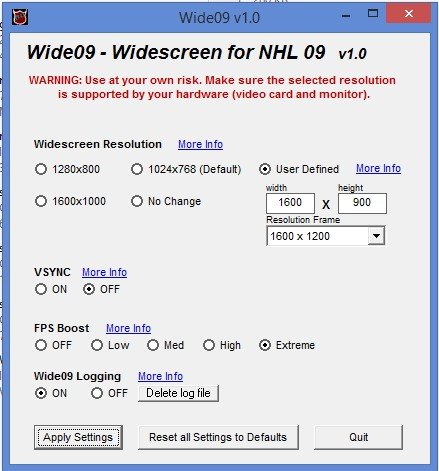 The Wide09 configuration window
It should now look like this or similar.
Step-by-Step Guide
1. Set Widescreen Resolution
Change "Widescreen Resolution" to "User Defined" and the Frame Size to a resolution that you know for certain is supported by your monitor and graphics card.
2. Find Your Monitor Resolution
You can find out what your monitor and graphics card support by checking your monitor settings. You can access these settings by right-clicking on the desktop and then clicking on "Screen Resolution" or "Display Settings".
3. Show All Resolutions
You will now see all the settings that your graphics card supports. If you don't see all settings, drag the slider down to see more resolutions.
4. Adjust Resolution Frame
The resolution you choose must fit into the "Resolution Frame" that you select afterwards. Then you must adjust the "Resolution Frame" so that it fits your chosen size, or you will have unused display area on your monitor.
5. Disable VSYNC
Turn off VSYNC. You can play around and test the rest of the settings as you wish.
Supported Resolutions
In the Windows display settings, you'll find a list of all supported resolutions. Here are the most common widescreen resolutions:
Starting the Game and Troubleshooting
Now you can start the game and the screen should be completely filled. However, it may happen that part of the playing field is not displayed correctly. This is usually the case at the top or bottom. If this is the case, please use the Camera Changer.
If you have no problems and everything is displayed correctly, you're done. Have fun!
A guide to playing NHL 09 on a widescreen monitor
Download the Wide09 program from the file base to your PC.
Copy Wide09 to your NHL09 directory and start the program.
Configuration
It should now look like this or similar.
Step-by-Step Guide
1. Set Widescreen Resolution
Change "Widescreen Resolution" to "User Defined" and the Frame Size to a resolution that you know for certain is supported by your monitor and graphics card.
⚠️ Important Note schrieb:
2. Find Your Monitor Resolution
You can find out what your monitor and graphics card support by checking your monitor settings. You can access these settings by right-clicking on the desktop and then clicking on "Screen Resolution" or "Display Settings".
3. Show All Resolutions
You will now see all the settings that your graphics card supports. If you don't see all settings, drag the slider down to see more resolutions.
4. Adjust Resolution Frame
The resolution you choose must fit into the "Resolution Frame" that you select afterwards. Then you must adjust the "Resolution Frame" so that it fits your chosen size, or you will have unused display area on your monitor.
5. Disable VSYNC
Turn off VSYNC. You can play around and test the rest of the settings as you wish.
Supported Resolutions
In the Windows display settings, you'll find a list of all supported resolutions. Here are the most common widescreen resolutions:
| Resolution | Aspect Ratio | Monitor Type | Frequency |
|---|---|---|---|
| 1920 × 1080 | 16:9 | Full HD / Standard |  Very common Very common |
| 1680 × 1050 | 16:10 | Older widescreen | Common |
| 1600 × 900 | 16:9 | HD+ monitors | Common |
| 1366 × 768 | 16:9 | Laptop standard | Very common |
| 1280 × 1024 | 5:4 | Older monitors | Rare |
| 1280 × 800 | 16:10 | Older laptops | Rare |
| 1024 × 768 | 4:3 | Very old monitors | Very rare |
Starting the Game and Troubleshooting
Now you can start the game and the screen should be completely filled. However, it may happen that part of the playing field is not displayed correctly. This is usually the case at the top or bottom. If this is the case, please use the Camera Changer.
If you have no problems and everything is displayed correctly, you're done. Have fun!
Author: Egorgiy | November 18, 2017